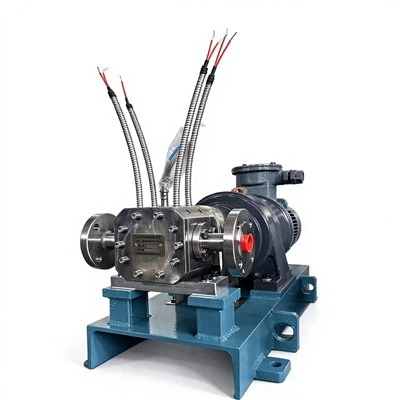
When it comes to the installation of a heat preservation gear pump, ensuring proper alignment is crucial for its optimal performance, longevity, and overall efficiency. As a reputable heat preservation gear pump supplier, we understand the significance of this process and are here to share some valuable insights on how to achieve accurate alignment during installation.
Understanding the Importance of Alignment
Before delving into the alignment process, it's essential to understand why alignment matters. Misalignment in a heat preservation gear pump can lead to a multitude of problems, including increased vibration, premature wear and tear, reduced efficiency, and even catastrophic failure. When the pump and its driver (such as a motor) are not properly aligned, excessive forces are exerted on the bearings, seals, and other components. This can cause overheating, leakage, and a significant decrease in the pump's operational lifespan. Additionally, misaligned pumps often consume more energy, leading to higher operating costs. Therefore, taking the time to align the heat preservation gear pump correctly during installation is a critical step that should not be overlooked.


Pre - installation Checks
Before starting the alignment process, several pre - installation checks should be carried out. First, inspect the pump and the driver for any visible damage or defects. Check the mounting surfaces of both the pump and the driver to ensure they are clean, flat, and free from debris. Any irregularities on the mounting surfaces can prevent proper alignment and lead to misalignment issues later on.
Verify the dimensions of the pump and the driver to ensure they are compatible with the installation site. This includes checking the shaft diameters, coupling sizes, and the overall footprint of the equipment. It's also important to review the manufacturer's installation instructions and specifications to understand the specific alignment requirements for your heat preservation gear pump.
Types of Alignment
There are two main types of alignment that need to be considered during the installation of a heat preservation gear pump: angular alignment and parallel alignment.
Angular Alignment
Angular alignment refers to the alignment of the pump and driver shafts in such a way that they are on the same axis without any angular deviation. To check for angular alignment, a dial indicator or a laser alignment tool can be used. A dial indicator is a mechanical device that measures small displacements. It is attached to the coupling of either the pump or the driver, and the probe is placed against the coupling of the other component. As the shafts are rotated, the dial indicator measures the radial and axial displacements. Any deviation from the zero reading indicates an angular misalignment.
Laser alignment tools, on the other hand, offer a more precise and efficient way to measure angular alignment. These tools use lasers to create a beam that is projected onto a target. By analyzing the position of the laser beam on the target, the amount of angular misalignment can be accurately determined.
Parallel Alignment
Parallel alignment involves ensuring that the pump and driver shafts are parallel to each other. This is important because if the shafts are not parallel, the coupling will experience uneven loading, which can lead to premature failure. Similar to angular alignment, dial indicators or laser alignment tools can be used to check for parallel alignment. For parallel alignment, the dial indicator is used to measure the axial displacement between the two couplings as the shafts are rotated.
Alignment Process
The following steps can be followed to ensure the proper alignment of a heat preservation gear pump during installation:
-
Mount the Pump and Driver: Place the pump and the driver on their respective mounting pads and secure them loosely using the mounting bolts. Do not fully tighten the bolts at this stage to allow for adjustments during the alignment process.
-
Initial Visual Inspection: Conduct a visual inspection to ensure that the pump and the driver are roughly in line. This can help identify any obvious misalignments and minimize the amount of adjustment needed later.
-
Set Up the Alignment Tools: If using a dial indicator, mount it securely on the coupling of one of the components. If using a laser alignment tool, follow the manufacturer's instructions to set it up correctly.
-
Measure the Misalignment: Rotate the shafts slowly and take readings using the alignment tool. Record the radial and axial displacements at multiple points around the coupling to accurately determine the amount and direction of misalignment.
-
Make Adjustments: Based on the measurements, make adjustments to the pump or the driver as necessary. This may involve shimming the mounting pads to correct angular or parallel misalignment. Use thin shims made of materials such as stainless steel or brass to ensure precise adjustments.
-
Re - measure and Repeat: After making adjustments, re - measure the alignment using the same tools. Continue this process of adjusting and re - measuring until the alignment is within the manufacturer's specified tolerance.
-
Final Tightening: Once the alignment is within the acceptable range, fully tighten the mounting bolts of both the pump and the driver. Make sure to follow the recommended torque values provided by the manufacturer to prevent over - tightening or under - tightening.
Maintenance and Monitoring
Alignment is not a one - time process. It's important to regularly monitor the alignment of the heat preservation gear pump during its operation. Vibration analysis can be used to detect any changes in alignment over time. Excessive vibration can be an indication of misalignment, and if detected, corrective action should be taken immediately to prevent further damage.
Periodic maintenance checks should also include a re - evaluation of the pump's alignment. This can help identify any potential alignment issues before they become major problems and ensure the continued smooth operation of the pump.
Our Product Offerings
As a heat preservation gear pump supplier, we offer a wide range of high - quality products to meet the diverse needs of our customers. Our E Series Asphalt Heat Preservation Pump is specifically designed for handling asphalt and other high - viscosity fluids. It features advanced heat preservation technology to ensure the smooth flow of the medium.
The Asphalt Electric Heating Pump is another popular product in our lineup. It utilizes electric heating elements to maintain the temperature of the asphalt, preventing it from solidifying during transportation and transfer.
For applications that require corrosion resistance and high - precision performance, our Stainless Steel Insulation Pump is an excellent choice. Made from high - quality stainless steel, it offers long - lasting durability and reliable operation.
Conclusion
Ensuring the alignment of a heat preservation gear pump during installation is a critical process that directly impacts its performance and lifespan. By following the steps outlined in this blog, you can achieve accurate alignment and minimize the risk of issues such as excessive vibration, premature wear, and reduced efficiency. At our company, we are committed to providing high - quality heat preservation gear pumps and reliable support to our customers. If you are in the market for a heat preservation gear pump or need further assistance with installation and alignment, please feel free to contact us for a purchase negotiation. We look forward to serving you.
References
- "Pump Installation and Maintenance Handbook", Industrial Press Inc.
- Manufacturer's installation and operation manuals of heat preservation gear pumps.